Administrator Tools
Here's some helpful free tools you can setup to use to work with your nodes before you get started.
User Account
We suggest setting up a user account and giving it access to the sudo (root) group. You will want to log in as this account to run all commands unless otherwise specified.
In this guide we will create & use the account serviceuser but feel free to customize the username to your liking:
adduser serviceuserSet a password, you can skip filling out the user info by pressing enter to leave it blank, confirm creation of new account. Then add permissions:
sudo usermod -aG sudo serviceuserNow you can disconnect and reconnect as the newly created serivceuser account.
SSH Keys
Now that you've got a regular user account with root access, the first key to easier administration is getting a public and private SSH key files. Here's how to generate those and please note if you re-run this with the same default options you will overwrite your existing keys.
Generate Key Pairs
- Run the following code in terminal or powershell on your pc to generate your keys:
ssh-keygen -t rsa -b 4096Where:
- -t stands for type. The above command generates an RSA type keypair. RSA is the default type.
- -b stands for bits. By default the key is 3072 bits long. We use a 4096 bits key for stronger security.
- The first prompt will ask you for the file name, just press enter to save in the default location if you have no other keys or pick a name. Your public file will be saved in the same spot but with .pub as an extension (For example id_rsa.pub with default name of id_rsa on private key)
- The second prompt will be for a password. You can set a password here for security or leave it empty so you don't have to input a password when connecting via SSH with this key pair.
When asked which file to save the key, you can simply press Enter to use the default file. Next, enter a good passphrase at least 20 characters long. The passphrase is used to encrypt the private key.
- The private key (your identification) will be save in the .ssh/id_rsa file under your home directory.
- The public key will be save in the .ssh/id_rsa.pub file.
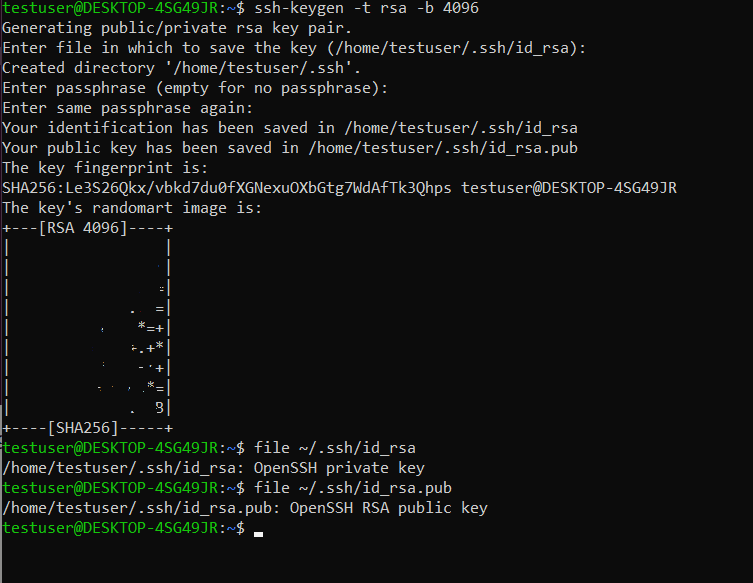 From the randomart image we can see the length of the key (RSA 4096). Now run the following commands:
file ~/.ssh/id_rsa
file ~/.ssh/id_rsa.pub
You should see the output above on the randomart image showing "OpenSSH private key" & "OpenSSH RSA public key".
If you see the “No such file or directory” error, that means the SSH keypair isn’t created. Run the ssh-keygen -t rsa -b 4096 command to create it again.
You now have a private and public keypair in your home directory .ssh folder named id_rsa & id_rsa.pub
- id_rsa - Keep this private, this is used on your workstation to unlock servers. Keep a copy of it or you may lose access to your servers.
- id_rsa.pub - This file will be used on your server provider host (or home linux server) to connect to the server with just the id_rsa key.
Add Keys to Server
Deploy a server with keys
On all server hosts, there will be a spot to input your private key on your account. Then when you create a new server you can apply the key to root so you can connect to root@[IP_ADDREESS] when the server is live. Most providers offer a service called "cloud-init" which allows you to run code as they deploy your server. Check out our Power Users guide for more info!
Add key to existing server
To add your keys to an existing server use your terminal and run the following code to upload your id_rsa.pub file customizing the user_name and IP_ADDRESS:
ssh-copy-id user_name@[IP_ADDRESS]The public key gets put into the remote user_name's ~/.ssh/authorized_keys file. You can also create this file by hand just be sure to set the permissions on ~/.ssh to 700 and ~/authorized_keys to 600 for safety.
Using ssh natively to connect
You can now use your local terminal or powershell to ssh into your server instantly. Just run the following code:
ssh user_name@[IP_ADDRESS]If that's now working to connect you can now use ssh to connect remotely & scp/rclone to transfer files from your home workstation to your server without even logging into it via ssh. We do suggest reading about Termius though as it's much more convienent overall for utilizing your server.
Security
Here's a few quick security tips that you can use to lock down your server and make it even more secure.
Disable Ping Response
You can disable ping responses sent to your server by running the following, re-run it with 0 instead of 1 at the end to re-enable:
sudo sysctl -w net.ipv4.icmp_echo_ignore_all=1Change SSH Port, Disable Password & Root Logins
You can change your ssh port from 22 to a new port for extra security along with locking it down to your home/work IP addresss to go the extra mile. To change the SSH port, Password Usage, and Root Account Login run the following command to open sshd_config in nano:
sudo nano /etc/ssh/sshd_configOnce your file is open, change the following options. You can change port 22 to another port here, just note the port to update your firewall rules.
# Change the following lines to update SSH port & disable password usage to login. Remove the # from the start of each line if it exists and update the option at the end of each line to your prefereences:
Port 22
PasswordAuthentication no
ChallengeResponseAuthentication no

# To disable the root account entirely change:
PermitRootLogin no
After you've updated the files you'll still need to commit the changes by running:
sudo systemctl restart sshdYour current terminal connection will remain live on the current port until you disconnect, please keep it open and remember you most likely need to edit/update a firewall rule for the new port.
Update Firewall
Update your firewall to change port 22 to the new port # you chose at this point. Here's a reminder on our Harmony & Fractal firewall notes. Sub your new port for 22 in the guides.
This is also a good time to set the new port to only allow your home/work IPs for extra security. Get your IP by visiting whatismyip.com (opens in a new tab).
Web Host Firewalls
Simply update the rule for port 22 to match the port number you used in your configuration above.
ufw Firewall Users
If you're not using a web firewall and are using ufw. Update our example port of 5022 to match the port you used in your configuration. Here's the updates to run for ufw:
Standard Config
sudo ufw allow 5022
sudo ufw delete allow 22
Locked IP Config
If you'd only like to allow from a specific IP address to your new port, run the following inserting your IP & Port:
sudo ufw allow from 203.0.7.10 proto tcp to any port 5022
sudo ufw delete allow 22
Reload UFW
At this point you'll need to reload ufw and your new port will become active.
sudo ufw reloadFail2Ban
If you'd like to go the extra mile you can also implement Fail2Ban on the SSH port. Fail2Ban will lock out any IP address that attempts and fails to login more than the maxretry you configure for the port or service.
Here's a guide (opens in a new tab) on how to install and enable it for SSH and a few other services but we'll give you the install and config for SSH here.
How to Install Fail2Ban
By default, Fail2Ban is installed in the Webdock LAMP/LEMP stack. If not installed you can install it using the following command:
sudo apt install fail2ban -yOnce Fail2Ban is installed, you can check the status of Fail2Ban with the following command:
sudo systemctl status fail2banYour service may be inactive still at this point, here's an example of possible outputs. We still need to configure which services so it's ok if it's not running at this time.
Offline:
○ fail2ban.service - Fail2Ban Service
     Loaded: loaded (/lib/systemd/system/fail2ban.service; disabled; vendor preset: enabled)
     Active: inactive (dead)
       Docs: man:fail2ban(1)
Online:
● fail2ban.service - Fail2Ban Service
     Loaded: loaded (/lib/systemd/system/fail2ban.service; enabled; vendor preset: enabled)
     Active: active (running) since Mon 2021-05-24 12:08:07 UTC; 3min 5s ago
       Docs: man:fail2ban(1)
   Main PID: 341 (f2b/server)
      Tasks: 7 (limit: 464145)
     Memory: 14.6M
     CGroup: /system.slice/fail2ban.service
             └─341 /usr/bin/python3 /usr/bin/fail2ban-server -xf start

May 24 12:08:07 ubuntu systemd[1]: Starting Fail2Ban Service...
May 24 12:08:07 ubuntu systemd[1]: Started Fail2Ban Service.
May 24 12:08:08 ubuntu fail2ban-server[341]: Server ready
Configure Fail2Ban for SSH
On Ubuntu Fail2Ban for SSH should automatically be enabled once you install Fail2Ban, but you can check if it is indeed enabled in the main jail.conf file or by checking the jail status with the CLI tool as shown in the sections below.
To manually configure Fail2Ban for SSH, you will need to create a jail.local file:
sudo nano /etc/fail2ban/jail.d/sshd.confAdd the following lines:
[sshd]
enabled = true
port = ssh
filter = sshd
logpath = /var/log/auth.log
maxretry = 3
bantime = 120
ignoreip = whitelist-IP
Save and close the file when you are finished then restart the Fail2Ban service to apply the changes.
sudo systemctl restart fail2banThe above configuration will block the remote IPs after three failed attempts to log in to your server via SSH. The remote host's IP will be blocked for 120 seconds.
Termius
Termius (opens in a new tab) is currently the tool of choice for any server administrators. You can import connections from any previously used apps to help configure profiles and hosts. It has built in SFTP file transfer and if you go premium it will sync to any device you log into termius on (including your mobile device). Get started with this guide by their team:
- Quick Start Guide (opens in a new tab) - Termius has a great guide that covers it all. Get familiar with Hosts, SFTP and Snippets.
Snippets
Snippets are shortcuts in termius that you can run with 1 click. Here's some of our favorites:
Other SSH Clients
Consider Termius but there are many other options to connect outside of Termius and your local shell.
- Putty
- MobaXTerm
- Terminal (Mac)
- Powershell (Windows)
sFTP Clients
A graphical user interface is great for transferring files. This is built into Termius which is why we suggest it but here are some alternatives.
Docker Installation
Docker is required to run Fractal, so with your new server online and logged in to the user you'll be running the programs as, install docker on your Ubuntu 20.04/22.04LTS system with the following command. If you user isn't servicefindora update that to be your username in the following code before running it on your server:
sudo apt update -y && sudo apt install apt-transport-https ca-certificates curl software-properties-common -y && curl -fsSL https://download.docker.com/linux/ubuntu/gpg | sudo apt-key add - && sudo add-apt-repository "deb [arch=amd64] https://download.docker.com/linux/ubuntu focal stable" && sudo apt install docker-ce -y && sudo usermod -aG docker servicefindoraReconnect your session
Disconnect from your server and reconnect. Verify your user account is in the docker group by running the following code:
groups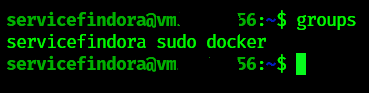
Once you've verified your user is in the docker group you can continue to the run installer step.
VS Code
Using Microsoft's VS Code (opens in a new tab) editor you can install the "Remote Developers Extension Pack" and connect to your server via SSH. Once connected you can open and edit files via their applicaiton GUI.
- Notes here on how to configure your server, user account and IdentityFile in your SSH configuration file for VS Code.
Linux Packages
Here's our recommendation for additional linux program tools you can load onto your validator nodes:
htop - Monitor your cpu, memory, service and application stats. Install if missing on ubuntu with:
sudo apt install htop -ynethogs - Monitor your network stats. Install if missing on ubuntu with:
sudo apt install nethogs -yTools & Scripts for Validators
Made by us, ⚡ EasyNode.PRO ⚡
Harmony ONE Scripts
We have a repository of Harmony Validator Scripts (opens in a new tab) with details on how to use those but consider using the toolbox over these tools, they are no longer maintained and are only community supported at this time.
Fractal FRA Scripts
We have a repository of Fractal Validator Scripts (opens in a new tab) with details on how to use those but consider using the toolbox over these tools going forward. These are still maintained for now.
Upgrades
Validator Toolbox (either) Upgrades
As we showed earlier in our snippets for upgrading, run those commands when you launch toolbox to pull the latest, install requirements, and launch the menu.
Updating Ubuntu 20.04/22.04 LTS
To run Ubuntu updates run the following command string - This will update your repo, pull in upgrade and dist-upgrades and cleanup any leftover unused packages.
sudo apt-get update && sudo apt-get upgrade -y && sudo apt-get dist-upgrade -y && sudo apt autoremove -yOnce completed you're up to date.
Should we reboot?
The unofficial motto of Linux is Never Reboot, so you probably don't have to unless you want to change Kernels. No need for that at this point if you don't want to upgrade.
However, if you'd like to stop your node from signing and reboot you can run the following command to upgrade Ubuntu and restart all in one command.
sudo apt-get update && sudo apt-get upgrade -y && sudo apt-get dist-upgrade -y && sudo apt autoremove -y && sudo rebootServer will automatically restart and you'll need to reconnect any open terminal sessions.
Any tmux sessions will also need to be restarted after a reboot.